Michigan String Art
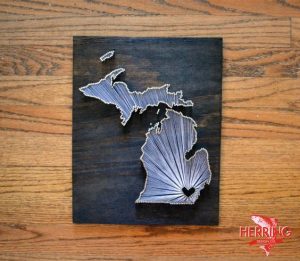
Photo from Herring Design Co
What better way to show your love for you home than a DIY Michigan decoration?
This craft is a relatively simple one to accomplish and will create a great looking piece to set on a mantle or display on a wall in your home.
- To start you’ll just need a piece of wood that’s the size you would like your final product to be. You can use any scrap wood you would like. You can stain the wood or paint the wood to your liking.
- Then, you’ll print out an outline of Michigan. (Or if you’d like to do a different shape, that’s an option too!) Attach the shape of your choice to the wood using tape. If you would like a heart in your artwork (like the photo attached above) make sure you have a print out of that too. (It’s helpful to put the nails in the outline of the state first, then put the heart outline in and do the heart.)
- After that you’ll take a bunch of small nails and create an outline of your shape. Start on the outside of the shape first before moving to the heart. You want to put the nails in evenly and as close together as possible. You want them to look as clean along the line of your outline as physically possible. This will make the final shape more defined. Once completed you can remove the pieces of paper.
- Then once you get all of those in, begin stringing! Start by looping whatever color string you would like around an outside nail and then wrap the string into the heart to a nail and then back out to the outline. Just be aware that there are more outline nails than heart nails so you will have to wrap the heart nails more than once. Then you just repeat until you finish! It definitely takes patience but it will pay off eventually!
For more information/more photos on the tutorial check out this website that I used to create mine!